RightPly TM Plywood Installation Instructions

RightPly™ Panel & Materials Preparation
- Allow all materials used in your flooring installation to acclimate to the heated home environment, approximately 70°F, for 24 to 48 hours prior to use.
- Store all panels on their 8' edge (separately if possible) to allow equal air flow over the face and back of the material.
- Examine each piece of RightPly™ plywood underlayment using the Flex & Look Test.
Follow these steps:
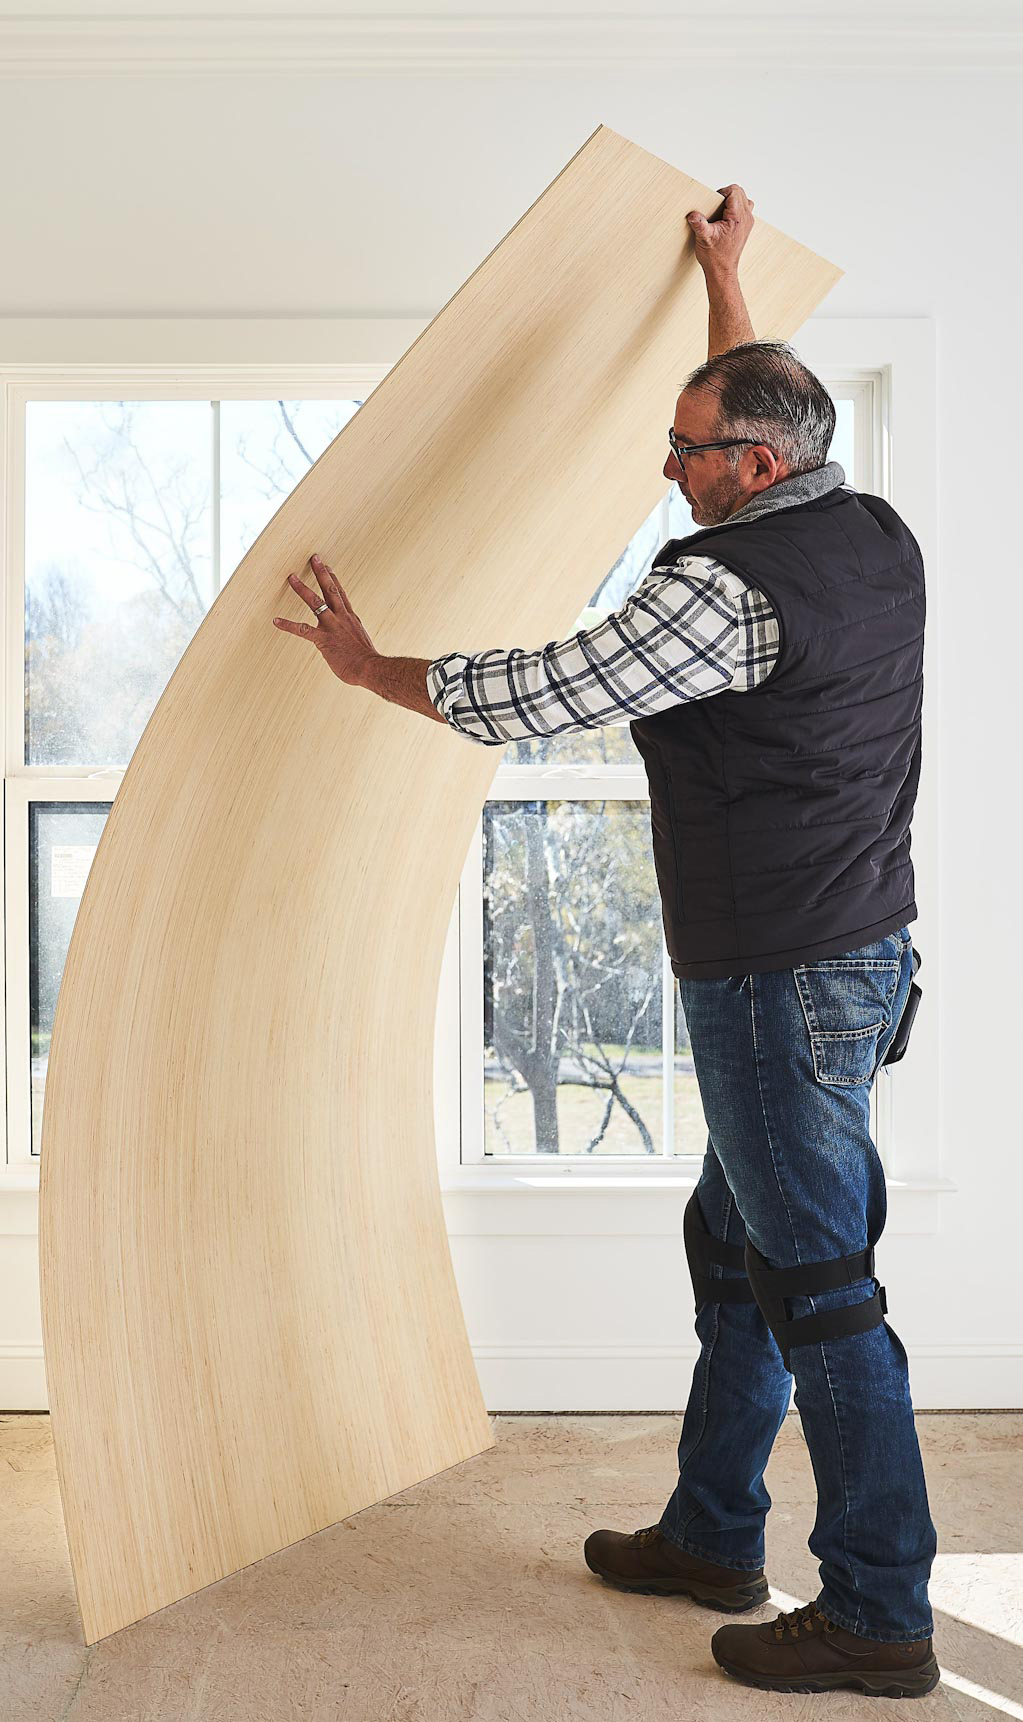
- Stand the panel vertically with its 4’ edge on the floor and the panel face towards you (the RightPly™ plywood stickers are on the back of the panel).
- Grip the top panel edge with one hand and firmly place the palm of your other hand against the face of the panel.
- Pull the panel down approximately 4”- 8” with your top hand while simultaneously pressing forward with the palm of your other hand approximately 4”- 8” until a noticeable curve is in the panel. Hold this position during inspection.
- With the panel in this flexed position, thoroughly inspect the entire panel surface for imperfections, which will look like “bubbles” or “creases”. In the rare instance you find such an imperfection, do not use the panel. Set it aside and contact Patriot Timber Products immediately for a resolution.
Structural Subfloor Preparation
- Install RightPly™ plywood underlayment over a clean, dry, level, original sound structural subfloor, or existing floor.
- Thoroughly scrape, sweep, and vacuum the entire surface and strip any wax from the existing vinyl.
- Do not use any adhesive beneath RightPly™ plywood underlayment.
Positioning RightPly™ Panels
- Run RightPly™ plywood underlayment panels perpendicular to the floor joists.
- Begin by laying out the floor in a corner of the room where you can get the greatest amount of coverage without having to cut the RightPly™ plywood underlayment panels.
- Position RightPly™ plywood underlayment panels 1/8" to 1/4" from the walls to allow for expansion.
- The panels should be cut so that the factory edges go together at the seams in the field of the floor. Hand cut exterior edges for installation next to the walls.
- Stagger RightPly™ plywood underlayment panels to create a 2" minimum offset between the RightPly™ plywood underlayment panel and subfloor seams.
- There are two methods for installing the RightPly™ plywood underlayment. The first method, and our preference for all RightPly™ plywood underlayment installations, is to install the panels without an expansion joint and without a seam filler. We recommend you use this method for installation under vinyl, vinyl composite tile, luxury vinyl tile, carpet, engineered flooring, and wood floors. For a RightPly™ plywood underlayment installation without an expansion joint, lightly butt the panels together without applying any pressure so they barely touch at the joints. The second method is to install the RightPly™ plywood underlayment with an expansion joint and using a seam filler. If you choose to install the RightPly™ plywood underlayment with a seam filler, leave a 5/64" gap, approximately the thickness of a nickel between each panel. Then fill the seams according to the seam filler manufacturers' instructions.
- Cut and place RightPly™ plywood underlayment on the subfloor without any fasteners or “dry fit” all panels first before beginning any fastening.
- Plywood underlayment panels should be laid in an offset pattern as shown in the Flooring Diagram so that four corners never directly intersect.

Fastening RightPly™ Panels
- Do not use any adhesive on the subfloor beneath RightPly™ plywood underlayment.
- We recommend a pneumatic fastener tool that incorporates an adjustable depth-drive control to prevent fastener “blowthrough” or “over-driving.” If this feature is not available, adjust the air pressure on the compressor to an appropriate level to avoid fastener “over-driving” or “blow-through.”
- You can fasten the RightPly™ plywood underlayment by selecting one of the following options:
• Galvanized coated chisel point staples with a 1/4” maximum crown
• Flathead wood screws treated with a moisture resistant coating (such as galvanized or zinc)
Do not use drywall screws. Do not select a fastener that is uncoated, cement or rosin coated, as they may rust and discolor your finished floor. The length of the selected fastener should be a minimum of 5/8”, but not so long that it protrudes through the bottom side of the subfloor. - Stand on each panel during fastening to ensure full contact with the subfloor. Any “crackling” or “popping” noises indicate debris is underneath the panel. Should this occur, stop the installation, remove and discard the panel, then scrape, sweep, and vacuum the subfloor again until all debris is removed.
- All fasteners should be slightly countersunk below the surface of the new underlayment.
- Fasten the 8' edge first at 2" on center - 1/2" from edge – starting from the corner of the room. Leave an expansion joint of 1/8" to 1/4" between the panel and the edge of the walls. Stand on the panel to ensure flush contact with the
- Return to the starting corner and fasten the 4' edge at 2" on center – 1/2" from the edge of the panel.
- Return to the starting corner and fasten the diagonal at 4" on center to the opposing corner.
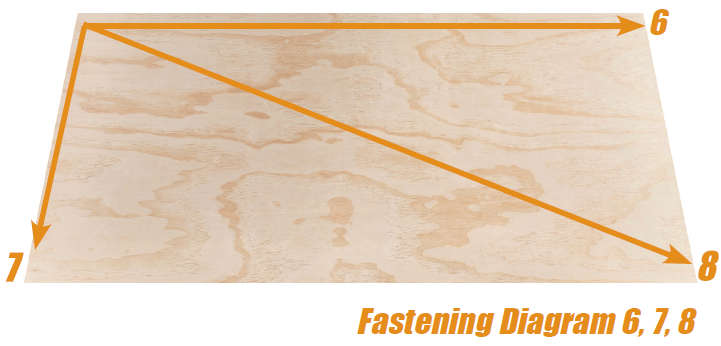
- Return to starting corner and fasten the “field” of the panel every 4" on center working in a diagonal direction across the face of the RightPly™ panel.

- Fasten the remaining 4' edge 2" on center – 1/2" from the edge of the panel.
- Finish the sheet by fastening the remaining 8' edge 2" on center – 1/2" from the edge of the panel. Note that the same procedure is used as well for the offset sheet which would start the next row of underlayment.

Using Seam Filler with RightPly™ Plywood
- If you choose to install the RightPly™ plywood underlayment with an expansion joint you must use a seam filler.* Check with your flooring supplier/manufacturer to be certain your seam filler is acceptable.
- Do not “floor-mix” seam fillers on top of the RightPly™ plywood underlayment panel face. Mix the seam filler separately in a bucket.
- Once the panels are fastened, apply the seam filler and allow it to dry completely in accordance with the manufacturer’s instructions. Allow sufficient curing time to completely dry the seam filler.
- Sand all joints with a belt or floor sander until level and smooth. Hand sanding is not sufficient.
- Do not oversand or “cup” the joints. Some additional application, drying time, and sanding may be necessary to smooth high or low spots.
- After sanding, the seam filler should fill the seams and be flush with the edges of the RightPly™ plywood underlayment panels. We do not accept “feathering” as a substitute for sanding the seam filler.
- Thoroughly vacuum the entire area to remove all debris before installing the floor covering.
* Note: You may leave an expansion joint without seam filler when RightPly™ plywood underlayment is used under carpet, engineered floors, or wood floors.
Causes of Telegraphing Seams and Panel Blow-Through
In our 50 plus years of experience, the majority of underlayment flooring failures are due to telegraphing seams and fastener blow-through. Telegraphing seams and fastener blow-through are always the result of incorrect installation. They are not caused by panel failure. There are many factors that can cause telegraphing seams. The most common are:
- The use of too much seam filler
- Not allowing the seam filler to dry sufficiently
- Not sanding the seam filler smooth and even with the plywood underlayment
- Panels being butted too tightly together
- Panels not properly acclimated
- Too high moisture content in flooring environment
- Uneven subfloors
- Placing the fasteners more than 1/2” from the edges of the panels
- Inconsistent fastener depth and blow-through along the edges of the panels
Fastener blow-through is caused by not properly adjusting the drive depth or air pressure in your staple or nail gun which can result in shooting the fastener completely through the underlayment. Nothing short of physical plywood failure such as a delamination will be warranted with regard to telegraphing seams.

Caution Regarding Point Overloading
Before moving or positioning any heavy object across the floor (such as a large appliance), place a minimum of 1/4" plywood on top of the completed floor to prevent point overloading
Call Us 336-299-7755 or Email Us for sales and technical information.